

SHOP THE POST

I always wanted a bar cart. Countless of hours were spent online looking up trolleys and pinning cute models that one day would reside in my own home. Unfortunately, becoming a home owner meant we are currently faced with very tight budgets so the lavish gold, mirrored trolleys i would see in stores would be too expensive for our newly reduced pocket. Having notions can be very expensive!
So this particular notion was parked indefinitely, to an one day status. Until one evening, i was browsing Instagram and ive seen a fab cart model – copper frame with marble trays – on Saloule’s and Sinead’s profile. And it was from IKEA of all places! Sarah and Sinead did an awesome job DIY’ing their Sunnersta Trolleys and i had to copy them immediately. And the best part is that it only costs €25!
IKEA SUNNERSTA BAR CART DIY STEPS
 You can get the IKEA SUNNERSTA Trolley (here) in any IKEA outlet of course, we had a bit of trouble finding it on display in the showroom but if you ask one of the staff members, they would be more than happy to point you to your very own flat packed bar cart of your dreams. Its the perfect canvas for DIY as it is perfectly white with clean lines and minimum hardware. A dream to work on. Did i mention its only €25?!
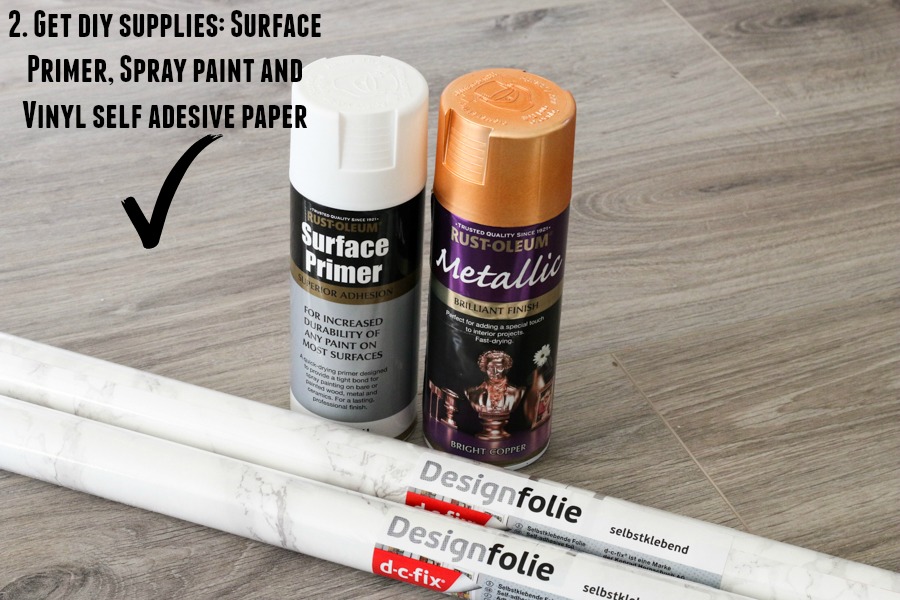 I had to consult the ultimate DIY expert – Catherine from DaintyDressDiaries when it came to getting my supplies. So after a quick chat and a few screengrabs, i proceeded on a maiden quest to Homebase to get my Rust-Oleum Surface Primer (white, matte finish) and two cans of Rust-Oleum Metallic Bright Copper Spray Paint. I went for a warm copper shade, but it would look brilliant with gold, silver or any other colors you might prefer – matte or metallic finishes. The world is your spray paint oyster!
The three cans of Rust-Oleum costed €13 each (€39 for the lot).
 As per Catherine’s advice, i primed the frame first with the Surface Primer and let it dry for about 30 minutes on each side. I honestly seen the difference between primed surfaces and non primed – i didn’t prime the bar cart handle (i forgot) and the spray paint didn’t go as smooth as it did on the primed surface. So like with makeup, make sure your work is well primed!
 I ordered my vinyl self adhesive marble paper from Amazon – got mine here. You can use any print, any colors that you might fancy, just make sure its a good quality vinyl that wont look too cheap or be too flimsy. I received two rolls of marble vinyl – i only had to use one – and it costed £6/€7. You don’t have to dress the trays in paper, you can just spray paint them and have a minimalist bar cart. Or you could glue on mirrors for a more glam look, again its your choice.
 The hardest job when it comes to self adhesive vinyl (at least for me) was to make sure there were no visible air bubbles, so take your time applying it to the surface.
 Last step, the FUN part! I used two cans of the Bright Copper and applied two coats on each side. The whole process took about an hour roughly due to drying time. The spray paint is a fast drying formula, so its touch dry in 20 minutes and fully dry in 24 hours. Also i loved that there was no smell whatsoever after it dried and no streaks or color differences. It was honestly due to the quality of the spray paint as i am quite the disaster at diy.
TAAAAA-DAAAAA!
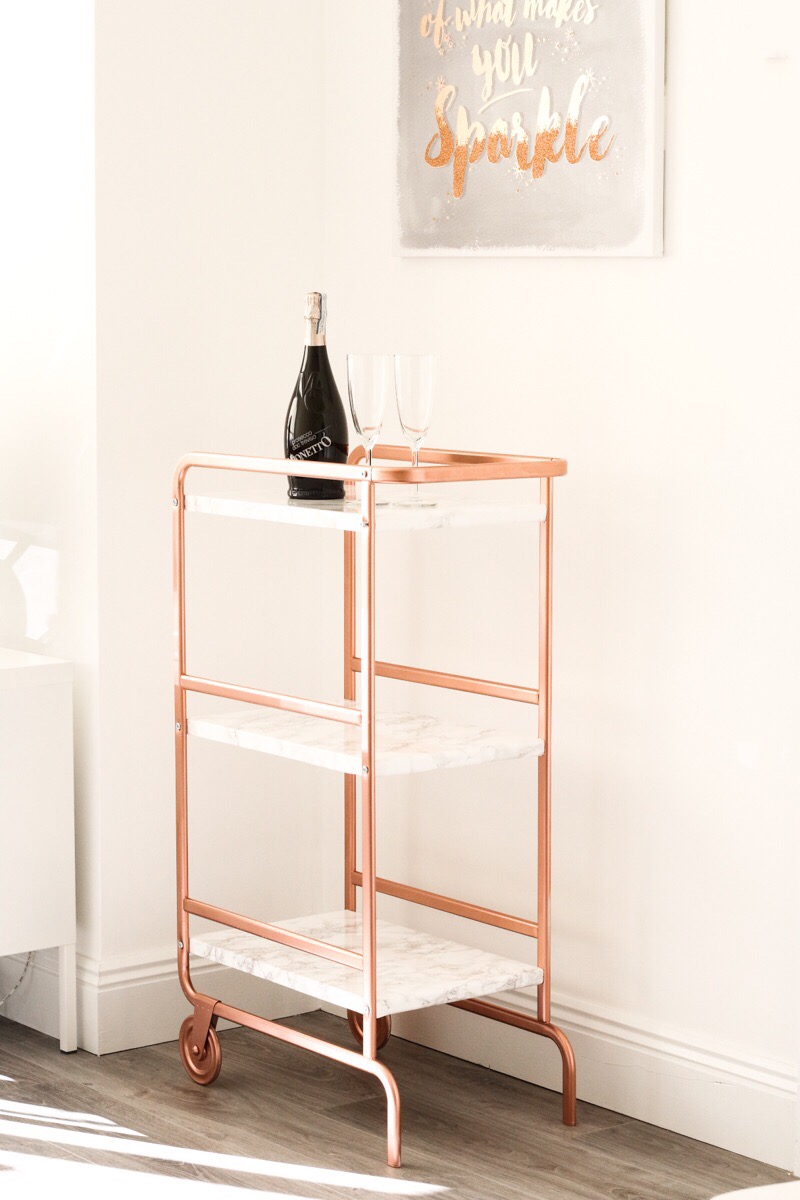

 What do you think? Personally im chuffed with how well it turned out and im already planning my next spray paint session!
SHOP THE POST


Andreea it’s an amazing job! Enjoy filling it with booze and then emptying it again ? Siobhan xx
Author
Thank you, booze and cake! haha x
Oh i love this! Well done gal, I’ll have to book mark this for when we get a bigger house!! x
Author
Thank you, im so happy with how it turned out. Im going to spray paint everything now! x
I love it! Now to fill it with lots of drinks 😛
Author
And treats! x
I saw this on your instastories! It looks great! xx
Beautylymin| LuxuryFragranceGiveaway
Author
Thank you! x
Your cart looks beautiful! I’m looking for something like this for a while. I have only one concern: since it has only 2 wheels, I’m worried that everything will fall down when I try to move it, or it will be too heavy to move easily. Is it easy to move it around?
Author
I have the trays slotted in inside out, in the normal position there is an edge that would stop falling. That said, it is easy to move around if you are careful. Mine is going to stay in a set place, so im not too concerned with wheeling it around.
How did you tackle the wheels? We’re thinking about doing something like this and would prefer to keep the wheel functional.
Author
I just sprayed paint them too and they remained functional. Just spray a layer and let it dry and then spin the weel for missed out patches.
I’d love to try this. Does anyone know what the US equivalent of the Rust-Oleum Surface Primer would be? Have been scouring their website but apparently that’s only available in the UK. 🙁
How do you fully cover the trays with the vinyl? Do you do underneath as well? Let me know!
Author
Hi Melissa, i did cover the edges of the tray with the vinyl too -just cut them to fit around the edges and corners. I didnt fully cover the back, just over the edges. Hope this makes sense x
Great job! My question is about moving it. When you pick up the grab-bar enough to lift the solid legs off the floor, and use the wheels, does it tilt too much to keep anything on the tray, or, do you need to fully empty it, and then move it and set it up? I’m hoping to make an appliance station that I can move, with the appliances still on it (like a blender, etc).
Author
Hi Kate, you can move the cart without having to remove the items only if you leave the trays as they were with the edges up. If you look at my pictures, you will notice that the trays are upside down and dont have that edge anymore that would prevent spillage. If you leave them as they are in the instructions, you are good to go! Hope it made sense x
Hi, I see you bought 2 cans of metallic but only one of primer. Did you need both cans of metallic or could I just get one?
Author
Hi, i bought one can on metallic and one of primer. Im not sure where you are seeing 2 cans of metallic. Only one is needed.